CAUTION: Repairing a garage door is a dangerous task. Garage door springs are under extreme tension and require appropriate safety precautions. Realize and understand the risks before undertaking any repair. Your health and safety is the #1 concern. No amount of financial savings is worth jeopardizing your health. Working on or around garage doors and openers could result in property damage, personal injury or death. While all efforts are made to provide accurate information and guidance, it is impossible to predict all repair circumstances. Accordingly, the user agrees that use of all products and information contained herein are at your own risk. In no event shall GARAGE DOOR STUFF .COM or Unique Repiar & Supply be liable for any property damage, personal injury/death, or any other loss or damage that may result from your use of the information and products provided on this site. All information contained within this site is provided “as-is” without warranty expressed or implied. User assumes all responsibility/risk for use of information and products purchased.
Measurements required are:
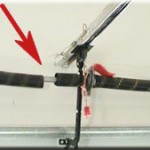
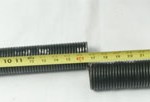
Length of the spring only, do not include the cones in this measurements, just the spring itself
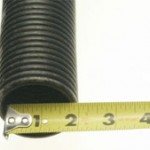
ID – Inside diameter of the spring. Taken from the end of the spring, the measurement between the coil
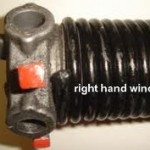
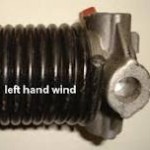
Wind – LH Wind or RH Wind. This does not mean what side of the door the spring is on, rather the direction the spring is wound, if you have a two spring door and the springs are joined in the center, you have a LH & a RH wound spring-Single spring doors will be either RH or LH wound- SEE PHOTO ABOVE TO DETERMINE RH / LH WOUND
Wire size – This is the thickness of one coil of the spring, expressed as a decimal. See the following directions for details of all 4 of these measurements.
DETAILED MEASURING INSTRUCTIONS:
All measurements must be taken from UNWOUND SPRINGS
Wound springs will give false measurements
Step 1 – Spring Length Measure the entire length of the spring. This measurement is to include all coils of the spring. If your spring is broken, measure both pieces of the spring in their entirety. If the spring is deformed to the point that an accurate length cannot be determined, count the total number of coils of the UNWOUND spring. Multiply wire diameter by total coils and this is the length.
Step 2 – Inside Diameter or I.D. is measured from the end of the spring. I.D. is measurement between the spring coils. This measurement can be taken with a tape measure or a caliper. On a residential door this measurement will typically be 1-3/4″, 2″, 2-1/4″ or 2-5/8″. Note: the spring I.D. may also be stamped on the spring fitting. Example: 175=1-3/4″, 200=2″, 225 = 2-1/4″or 263=2-5/8″.
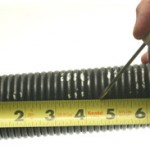
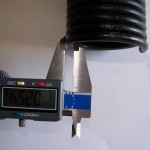
Step 3 – Wire Diameter This is the measurement of the thickness of one coil of the spring. There are several ways to measure wire diameter. Caliper, micrometer, tape measure and wire gauge. Tape Measure – When using a tape measure to measure wire size you count a specific number of coils and convert that measurement to a decimal. Use our chart below and count 10, 20, 30 or 40 coils. It is a good practice to count and measure at least two of these groups of coils. IE: count 20 coils, record this measurement then count 30 coils and compare both measurements to our wire chart Caliper or Micrometer – Place the caliper or micrometer on one coil of the spring. This measurement, expressed in a decimal, is the wire diameter.
WIRE SIZE 10 COIL COUNT 20 COIL COUNT 30 COIL COUNT 40 COIL COUNT
.187 1-7/16 3-3/4 5-5/8 7-1/2
.192 1-15/16 3-7/8 5-3/4 7-3/4
.207 2-1/16 4-1/8 6-1/4 8-1/4
.218 2-3/16 4-3/8 6-1/2 8-3/4
.225 2-1/4 4-1/2 6-3/4 9
.234 2-5/16 4-5/8 7 9-1/4
.243 2-7/16 4-7/8 7-1/4 9-3/4
.250 2-1/2 5 7-1/2 10
.262 2-5/8 5-1/4 8 10-1/2
.273 2-3/4 5-1/2 8-1/4 11
.283 2-13/16 5-5/8 8-1/2 11-1/4
.289 2-7/8 5-3/4 8-3/4 11-1/2
.295 2-15/26 5-7/8 8-3/4 11-3/4
Step 4 – Determine Right or Left Hand Wound Compare your spring to the images above and determine right or left hand wind. NOTE: This is not what side of the door the spring is on, it is what way the spring is WOUND. Look at your spring from the end of the spring, then look at the images above, LH Wound is on the left, RH Wound is on the right. We are referring to the photo’s at the top of the listing captioned Inside Dia.
NOTE: WHEN ORDERING A PAIR, YOU WILL RECEIVE ONE LH & ONE RH WOUND SPRING.
When installing the new springs, insure that you are matching the winding of the new springs to the existing springs.




Comments are closed.